Choose one shot from your Shot Breakdown and create a finished animation with it (fully colored, all applicable effects, etc.). If you are using 2D puppets, then alternatively you can create a walk cycle or simple acting test with 1 finished puppet as a test of concept.
The purpose of this test is to check and see how long does it realistically take to complete one shot in your chosen style, ideally with enough time to make changes if the style ends up being impractical to work with.
Monday, October 12, 2020
Sunday, October 11, 2020
Production Checkpoint I: Shot List
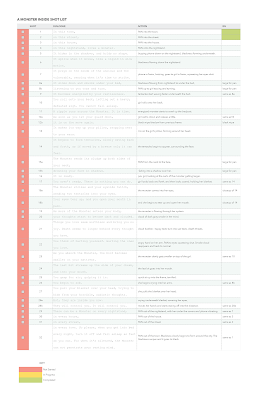
Create a list of all of the shots in your production, along with any details you need to help keep track of what is needed. This document will serve as a guide to help you see the full scope of your project, what's needed, what you may need outside help with, and what shots may be easy/notably cumbersome, etc.
Examples:


Examples:
Monday, September 14, 2020
Preproduction Package
Due 9/28
Refine the elements of your preproduction package as applicable and submit them for grading. The package should include:
Moodboard(s)
Character Design(s)
Environment Design(s)
Beat Board(s)
Animatic
Refine the elements of your preproduction package as applicable and submit them for grading. The package should include:
Moodboard(s)
Character Design(s)
Environment Design(s)
Beat Board(s)
Animatic
Preproduction: Storyboards
Due 9/21
Create your first draft of storyboards detailing your story from beginning to end and put them together as an animatic. The boards may be rough and sketchy, but need to be easy to read and follow. They may be created on any software that you choose, or even done by hand on paper or index cards. Just keep in mind how you plan to import the storyboards onto the computer.
Storyboard Panel Examples:


Sunday, September 13, 2020
Preproduction Concept Development: Characters and Environments
Due 9/16
In this stage you're going to focus more on the details for both the character(s) and the environment(s). Each character featured in your animation project should have a design so that you have a set style, outfit, proportions, etc. to work with, and you should have some idea as to your background. This stage is dedicated to just fleshing out your ideas for these details, and don't have to be locked in. Would help if these were colored, even just rough colors to help figure out your lighting and to help ensure that your characters and backgrounds look like they belong together. This is especially important if you don't plan on going with the color scheme that you have going in the Beat Boards. If all of the color information is available in your Beat Boards, then you can get away with minimal or no colors in the environment and character designs.
These designs can be done on paper or digitally, but must be submitted digitally. You can scan your work or take a clear photo with your smart phone.
Environment Designs
Create designs for what your environment could or should look like (if applicable). Depending on the needs of your project this could be done in a variety of ways, including but not limited to:
A map
2D rough sketching
3D primitives in Maya or a layout in Google Sketchup.
AutoCAD design
Whatever helps you prepare for your production and gives something tangible for your audience (colleagues, directors, clients, potential investors, network agents, etc.) to see and understand. Keep in mind that in a real world project you may have to use these concepts to help your audience see what you see.
Examples:


Character Designs
Create a sheet of rough sketches for what your character(s) may look like. At this stage we would do Blue Sky Designing (also known as Speculative Design) where each drawing of the character may look very different from the others. This stage is all about figuring out what the character could look like - not necessarily their final look. It can match the style test in the beat boards, but it doesn't have to. Try not to lock yourself down into a final look for the character(s) too early. Play around with them - try varying their shapes and proportions.
Examples:


Subscribe to:
Posts (Atom)
-
 Create a list of all of the shots in your production, along with any details you need to help keep track of what is needed. This document w...
 -
 Due 9/16 In this stage you're going to focus more on the details for both the character(s) and the environment(s). Each character fe...
 -
 Due 9/21 Create your first draft of storyboards detailing your story from beginning to end and put them together as an animatic. The boa...